How to Size Your Bitcoin Position: The 1% Risk Rule
BTC is down 7% in 7 days to $60,517, Fear & Greed at 17 (Extreme Fear). Position size = risk amount ÷ stop distance. The 1% rule limits account blow-ups when markets drop fast.
How to size your Bitcoin position: the 1% risk rule explained
Bitcoin is at $60,517 as of June 24, 2026, down 7% in 7 days. Fear & Greed reads 17, Extreme Fear territory. RSI is at 42.4. Most traders looking at this chart are either frozen or tempted to go big on what looks like a bottom. Both reactions are wrong. The real question isn't whether to trade. It's how much to put on.
TL;DR
- Bitcoin is at $60,517 as of June 24, 2026, down 7% in 7 days, with Fear & Greed at 17 (Extreme Fear) and RSI at 42.4
- Position sizing is how much capital you risk on a single trade. Most traders set it by feel, which destroys accounts
- The 1% rule: risk no more than 1% of your account on any single BTC trade
- Formula: position size = risk amount (1% of account) ÷ stop distance percentage
- In Extreme Fear conditions like now, cut to 25–50% of your normal size until RSI and sentiment stabilize
What is Bitcoin position sizing?
Position sizing is the dollar amount you commit to a single trade. It determines how much you lose if the trade hits your stop-loss and how much you gain if it reaches your target. It is not the same as account size. A $10,000 account can take a $500 position or a $9,000 position. That difference is position sizing, and it's where most traders do the most damage.
Most beginners size by feel. They put on "a little" when nervous and "a lot" when confident. Confident happens most often near tops; nervous happens most often near bottoms. That pattern destroys accounts systematically.
A rules-based approach fixes this. The 1% rule is the most common framework: never risk more than 1% of your total account on a single trade.
How does the 1% risk rule work for Bitcoin?
The 1% rule doesn't mean you put 1% of your account into BTC. It means you set your stop-loss so that if you're wrong, you lose no more than 1% of your account.
The formula:
Risk amount   = Account size × 1%
Position size = Risk amount ÷ Stop distance (%)
Here's a worked example with current market prices:
| Variable | Value |
|---|---|
| Account size | $10,000 |
| Max risk per trade (1%) | $100 |
| Entry price | $60,517 |
| Stop-loss | $57,491 |
| Stop distance | $3,026 (5.0%) |
| Position size | $100 ÷ 5.0% = $2,000 |
| BTC amount | $2,000 ÷ $60,517 = 0.033 BTC |
If BTC drops to $57,491, you lose $100, exactly 1% of your account. If BTC reaches your target instead, your upside scales at the same ratio times your risk-reward multiple.
Risk 1%, aim for 2–3×. That's the math that keeps you alive through losing streaks.
Why does stop distance change your position size?
Your stop-loss placement directly controls how much BTC you can buy at a given risk level.
Tighter stop = bigger position. Wider stop = smaller position. At the same $100 risk (1% of $10,000):
| Stop Distance | Position Size ($) | BTC at $60,517 |
|---|---|---|
| 1.5% below entry | $6,667 | 0.110 BTC |
| 3.0% below entry | $3,333 | 0.055 BTC |
| 5.0% below entry | $2,000 | 0.033 BTC |
| 8.0% below entry | $1,250 | 0.021 BTC |
This is why arbitrary stop placement is expensive. Dropping your stop an extra 2% to "give it more room" cuts your position size nearly in half. Moving it tighter to get a bigger position means normal volatility stops you out before the trade works.
In the current environment, BTC is dropping 3–5% in single sessions. A 1.5% stop is going to get hit by noise. A 5–8% stop is more realistic, which means a $1,250–$2,000 position, not a $6,000 one.
How should market conditions affect your position size?
The 1% rule sets your maximum loss per trade. Market conditions tell you when to run at full size and when to pull back.
A setup in a trending market with RSI above 60, Fear & Greed climbing toward neutral, and a confirmed structural trigger has higher probability. Run at full 1% risk.
The current setup (RSI at 42.4, Fear & Greed at 17, BTC down 7% in a week with no confirmed bounce) is lower probability in both directions. Volatility is high, the range is wide, and the market is in panic mode. Half size or less is the disciplined call.
| Market Condition | RSI | Fear & Greed | Sizing Adjustment |
|---|---|---|---|
| Strong uptrend, confirmed | >60 | >45 (neutral+) | Full (1% risk) |
| Mild trend, mixed signals | 50–60 | 35–45 | 75% |
| Choppy / ranging | 40–55 | 25–40 | 50% |
| Extreme Fear, no clear trend | <45 | <20 | 25–50% |
| Free-fall / capitulation | <35 | <15 | 25% or flat |
As of June 24, BTC falls into the "Extreme Fear, no clear trend" row. If you trade here, 25–50% of your standard position is appropriate. This environment punishes sizing errors more than usual — even when the trade direction ends up being right.
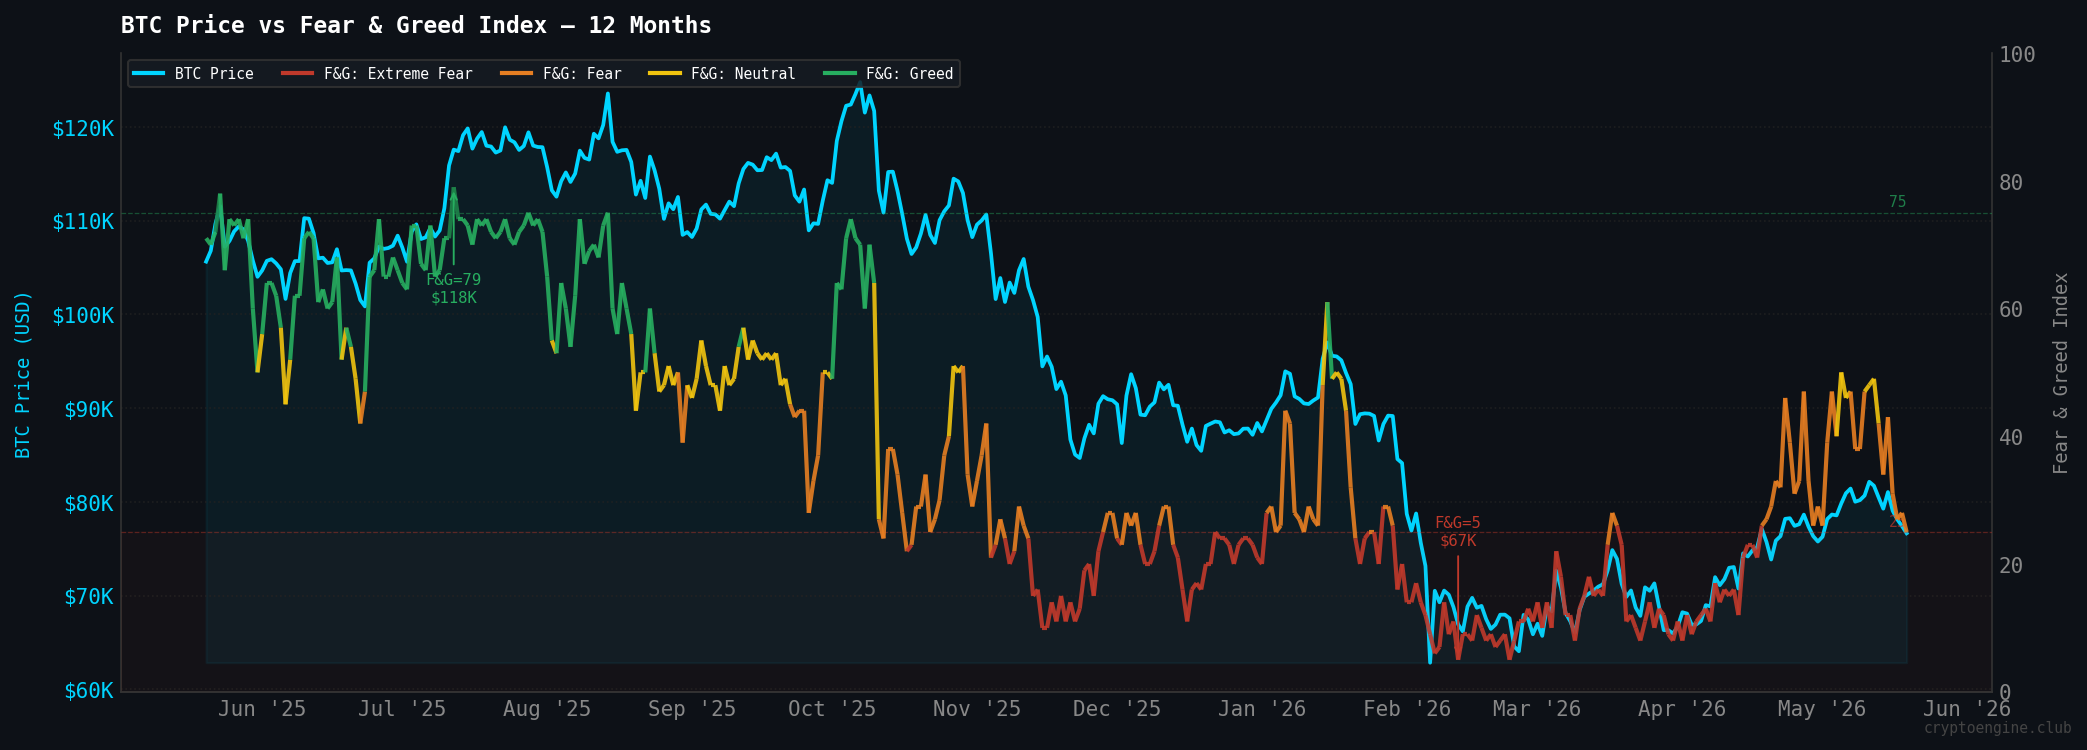
The 12-month chart above shows how sustained Extreme Fear periods sit alongside BTC price. Recoveries from Fear readings below 20 happen, but rarely in a straight line. Wide stops and reduced positions let you stay in the game through the chop rather than getting stopped out twice before the move materializes.
Common mistakes in Bitcoin position sizing
The most common one is sizing based on conviction. "I'm really sure about this trade" is not a sizing method. Conviction doesn't change the probability of the setup; it just makes you feel worse when you're wrong with a full position. Use the formula regardless of how the trade feels.
The second mistake is keeping size fixed across all conditions. A $3,000 position in a trending market with tight volatility is not the same risk as a $3,000 position when BTC is dropping 5% a day in Extreme Fear. Volatility expands stop distances and raises the chance of getting stopped out before the trade works. Conditions change; your position size should too.
The third is averaging down after a stop. When a trade hits your stop-loss, the instinct is to re-enter at a lower price with more size. This breaks the 1% rule immediately. Now you're risking more on a trade that has already proven itself wrong once. Each trade is a separate risk event. A new entry at a lower price is a new trade with a fresh 1% allocation, not a continuation of the old one.
How it all fits together
Position sizing connects every part of your trading decision.
Your entry sets the starting price. Your stop-loss, placed at a level where the trade thesis is wrong, determines stop distance. The 1% rule converts that distance into a specific BTC amount. Market conditions (RSI, Fear & Greed) tell you whether to run at full risk or pull back.
As of June 24: BTC at $60,517, RSI at 42.4, Fear & Greed at 17. CryptoEngine's active SHORT fired June 18 at $62,823, currently +0.8% (3-day) with a 10/10 win rate on the last 10 completed signals (5-day). That signal gives you a specific entry price and structural stop level, the exact inputs the formula needs. You still have to decide the size. At 1% risk with a 5% stop distance from $62,823, a $10,000 account gets a $2,000 position. Appropriate for this environment.
Want entry price, stop, and target pre-calculated for every BTC signal? That's what CryptoEngine delivers.
Frequently Asked Questions
What is the 1% rule in Bitcoin trading? The 1% rule means you risk no more than 1% of your total account on any single trade. If your account is $10,000, you set your stop-loss so that a losing trade costs you no more than $100. This limits the damage from any individual loss and keeps you in the game through inevitable losing streaks.
How do I calculate position size for a Bitcoin trade? Divide your max risk amount by your stop distance percentage. If you risk $100 (1% of $10,000) and your stop is 5% below entry, your position size is $100 ÷ 5% = $2,000 worth of BTC. Tighter stops allow bigger positions; wider stops force smaller ones. In volatile environments, wider stops are the honest call.
Should I use the same position size for every Bitcoin trade? No. Market conditions should scale your position up or down from your 1% maximum. In trending markets with RSI above 60 and rising sentiment, trade at full size. In Extreme Fear environments like now (Fear & Greed at 17, RSI at 42.4), cut to 25–50% of your standard size. The 1% rule sets the ceiling. Conditions decide where below it you operate.
What happens if I ignore position sizing? Most traders who blow up accounts do it through sizing errors, not bad trade ideas. Going full-account on a trade that hits a stop wipes out weeks of gains. A 10-trade losing streak at 1% risk costs 9.6% of your account, painful but recoverable. The same streak at 10% per trade costs 65%.
How does a stop-loss connect to position size? Your stop-loss placement is the key input to the sizing formula. A wider stop forces a smaller position at the same 1% risk. A tighter stop allows a bigger position, but gets hit more often by normal volatility. In Extreme Fear environments like now, wider stops are more realistic, which means smaller positions. That's not a penalty. It's the market telling you how much risk it's carrying right now.
Disclaimer: This article is for educational purposes only and does not constitute financial advice. Past performance does not guarantee future results. Always do your own research before making trading decisions.
Market data via CoinGecko.